miércoles, 30 de mayo de 2012

Green Chile Cheeseburger

I have always liked hamburgers. But when I was pregnant, I LOVED them. I ate them nearly every week, more often if possible. We mostly made our own at home, but we did eat them out occasionally - a few times at Red Robin (teriyaki burger with pineapple), if I was lucky enough to get my prenatal appointment scheduled just before lunch. I was not above fast food burgers either, and may have waddled over to McDonalds (more than once) on my lunch break for a hamburger (regular burger, extra ketchup). At home my favorite was a burger cooked on the barbecue with barbecue sauce and topped with cheese and relish. I never got very fancy, because spending time on fancy burgers meant it took longer before I could start eating.

We haven't had burgers very often lately, and I'm not sure why. It seems I am always looking for fast and easy and cheap and healthy meals, and I guess I forgot that a burger can fit that bill. Hey, 3 out of 4 ain't bad.

We were talking about burgers a few weeks ago and this recipe popped into my head - Robert Olguin's Buckhorn Burger recipe from Bobby Flay's Throwdown cookbook.


A green chile cheeseburger sounds like a lot of work, but this one really isn't. Cook your burger, and while it's cooking, heat a small pan, with a touch of oil, and add some diced red onion. Let that cook for a couple of minutes, then divide into piles (1 pile for each burger you are cooking). Top each pile with some cheese and let it sit over low heat to melt the cheese and soften the onions. In another pan mix some diced green chiles (we used canned) and some granulated garlic and warm through. Spoon the chiles on to the onion and cheese piles. Put your burgers on the buns, top the patty's with the onion/cheese/chile piles, and garnish with lettuce, tomato, pickles and mustard.

Yum, yum.

http://feedproxy.google.com/~r/SpanishRecipesinpictures/~3/8FCESVbimro/chocolate-cookies.html

Yes, I baked a batch of cookies! And yes, they were absolutely delicious... all that butter, all...

Get the rest in my blog! See you there!

jueves, 24 de mayo de 2012

Green Chile Cheeseburger

I have always liked hamburgers. But when I was pregnant, I LOVED them. I ate them nearly every week, more often if possible. We mostly made our own at home, but we did eat them out occasionally - a few times at Red Robin (teriyaki burger with pineapple), if I was lucky enough to get my prenatal appointment scheduled just before lunch. I was not above fast food burgers either, and may have waddled over to McDonalds (more than once) on my lunch break for a hamburger (regular burger, extra ketchup). At home my favorite was a burger cooked on the barbecue with barbecue sauce and topped with cheese and relish. I never got very fancy, because spending time on fancy burgers meant it took longer before I could start eating.

We haven't had burgers very often lately, and I'm not sure why. It seems I am always looking for fast and easy and cheap and healthy meals, and I guess I forgot that a burger can fit that bill. Hey, 3 out of 4 ain't bad.

We were talking about burgers a few weeks ago and this recipe popped into my head - Robert Olguin's Buckhorn Burger recipe from Bobby Flay's Throwdown cookbook.


A green chile cheeseburger sounds like a lot of work, but this one really isn't. Cook your burger, and while it's cooking, heat a small pan, with a touch of oil, and add some diced red onion. Let that cook for a couple of minutes, then divide into piles (1 pile for each burger you are cooking). Top each pile with some cheese and let it sit over low heat to melt the cheese and soften the onions. In another pan mix some diced green chiles (we used canned) and some granulated garlic and warm through. Spoon the chiles on to the onion and cheese piles. Put your burgers on the buns, top the patty's with the onion/cheese/chile piles, and garnish with lettuce, tomato, pickles and mustard.

Yum, yum.

AVAL PAYASAM | RICE FLAKES PAYASAM

I make this payasam every friday for pooja. This is the simplest & delicious payasam that can be made in 10-15 minutes.
Aval payasam1
INGREDIENTS
  • Thick rice flakes / poha/ Aval - 1 handful
  • Powdered jaggery - 1/4 cup or little less
  • Cardamom seeds - 2 nos (powdered)
  • Ghee - 1 tsp
  • Water - As  reqd
  • Roasted Cashews - a few
For additional flavor
  • Cloves /Krambu- 2 nos
  • Roasted Nutmeg powder/ Jathikkai - A pinch
  • Edible camphor / Pachai karpooram - a pinch

METHOD
  • Heat a kadai with a tbsp of ghee and roast the cashews.Set aside
  • In the same kadai, roast the aval and cardamom together for 3-4 mins. Aval becomes crispy and turns little brown.
  • Allow it to cool. Powder it finely along with cardamom.
  • Now take the water in a bowl and add the powdered aval.Cover and cook for 5 mins. Stir in between and check the water level.
  • Add more water if needed. Now add the powdered jaggery and mix well.
  • Allow it to boil for 5-10 mins. Finally add the roasted cashews. Add the items given under 'flavor' if necessary.
****Add  little milk at the end to adjust the sweetness. Enjoy !!
NOTE:
    1. U can add coconut milk for richness. But it should be added at the end before switching off the flame.
    2. If u feel sweetness is more, add little boiled milk.
    3. When u add milk along with jaggery , payasam gives a curdled look.To avoid this, add milk only at the end.
    4. If u want, u can replace jaggery with sugar.
    5. Here i've powdered the aval. If u wish, u can roast the aval and cook as it is. It will take little more time to cook.


lunes, 21 de mayo de 2012

Filled Chocolate Cupcakes - The recipes - revised January 2011

This is an update to this recipe which was put up in September. I was making them again recently (January '11), and realized that there was an error in the ingredient section (probably, because as you can tell from the following text and photo, I had trouble reading my soiled recipe copy).  The gram weight of flour was correct, but the corresponding cup measurements were not.  If you have printed out this recipe, please check the updated ingredients. 

In addition to this, if you read the prior post, you might have noticed that I wasn't happy with how tender the cupcakes were.  This time around, I did some more experimenting and found that using bread flour instead of all-purpose made for a sturdier cupcake, and, I added another egg.  This made the cupcakes firmer, also helped them rise higher and allowed me to get the cupcakes out of the liners more easily.

The following is the original post, with the appropriate corrections made to the ingredients.
----------------
I've been trying to get this post done since the summer, but I had to grab a few minutes late at night to write up my recipes, because the days were filled with BCC Rally auction stuff.  Now that the auction is over, I finally have time to post.  But when I go back to see what I've done, I can hardly read the recipe because it's covered in chocolate! 


That's why you need a CD-rom cookbook (mine, of course).  Because instead of having a cookbook that's covered in chocolate, you can have a few recipe pages that you've printed off, and when you're done, you toss the messy things out!  But now, on to the recipe!

The Cake

The first time I made the cupcakes with Veronica and Jasmine (see Filled Chocolate Cupcakes, Part 1, I used a light version of my Chocolate Layer Cake.  They were delicious, but a bit too tender.  I think they were so tender because we used the maximum amount of milk (3/4 cup) and because we mixed them by hand.  When I made them again, I used just a bit more than the minimum, and they came out much better - a little denser, which held up better for a pick-up type cake.

Makes 42 mini-cupcakes or 12 regular cupcakes

2-1/2 ounces semisweet chocolate, chopped
1 tablespoon oil

1 cup minus 1-1/2 TB (122 grams) bread flour, measured by fluffing, scooping and levelling*
2 tablespoons  unsweetened cocoa powder
3/4 teaspoons baking soda
1/8 teaspoon salt

5 tablespoons (2.5 ounces) unsalted butter, cut into tablespoons and at room temperature
1/4 cup light brown sugar
1/2 cup sugar
1/2 teaspoon vanilla

2 large eggs, room temperature
1/4 cup + 2 tablespoons sour cream, room temperature

1/3 cup cup milk (skim or regular), room temperature

Preheat the oven to 350 degrees F. with an oven rack in the middle of the oven. Line muffin pans with liners.
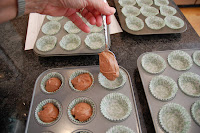
You can see that they sort of pop up and don't stay down in the cups.  Just give them a good shove from above, and let the sides pleat.  When you add the batter, they will stay down.
Place the chopped chocolate and the oil in a microwave-safe container. Micro-cook on medium (#5) for 1 minute. Stir and then reheat in 15-second increments on medium power until the chocolate is melted.

In a small bowl sift together the flour, cocoa, baking soda and salt. Set it aside.


In a mixer bowl, combine the butter and both sugars. Beat on medium speed for 3-5 minutes until the mixture is uniformly smooth and creamy, and well aerated. Beat in vanilla. Add the eggs, beating for 1 minute after the addition of each egg, and scraping down the bowl a few times.

On low, beat in the sour cream and chocolate. On low, in 4 additions, beat in the flour mixture alternately with the milk, starting and ending with the flour. (This is actually easier to do by hand, because the batter doesn't tend to separate when you do it by hand, but it does make the cake more tender when done by hand).


Spoon the batter into the muffin cups, using one spoon to scoop up the batter and the other to push the batter into the pans. Fill the cups 1/2 to 3/4 full.

Bake for 8-11 minutes for the minis, or 15-20 minutes for the full-size cupcakes, until a tester comes out clean. Set the tins on a wire rack until the cupcakes are cool, and then remove them from the pans.

The Filling
I used whipped cream to fill the cherry-topped cupcakes, and Simple Vanilla Buttercream for the ones that look like Hostess cupcakes.  The cream was easier to make, but the buttercream tasted far better. I've been making my buttercream a little thicker and sweeter lately, by adding a little powdered sugar to my basic recipe, but for this I wanted a filling that was very creamy - again so that it would be reminiscent of Hostess cupcakes. To do this, I used less than half of the powdered sugar as usual.

It's ultra important that the butter be at the right temperature for this recipe to work, AND THE ROOM!  If the room is too hot, the buttercream will never form.  The room should be no warmer than 74 degrees - and colder is even better.

To get the butter the right temperature, cut it into tablespoons and let it stand on a cutting board until barely soft. Using your thumb, push down on each pat to flatten it into the board (it will still be very firm, and will split when you press down on it). In 3-5 minutes the butter should be ready. If you press down on it with your thumb, it should yield readily, but should not be soft and melty. If the butter is a little firm, it can always be beaten a little bit more, but if too soft, you'll have to refrigerate it, and start over. I always aim for a little bit harder, rather than too soft.

2-1/2 sticks (20 tablespoons) unsalted butter, at cool room temperature
1 pound jar Marshmallow Fluff (this is a natural product containing only eggs, corn syrup and flavoring - so don't use another brand unless you check the ingredients)
1 teaspoon vanilla extract
2-3 tablespoons sifted powdered sugar
1-2 tablespoons corn syrup, to taste
2-3 tablespoons milk to soften the buttercream, optional

Now that the butter is at the proper temperature, scrape the butter into a mixing bowl and beat it until creamy (1 or 2 minutes.) Scrape down the bowl. Beat in the powdered sugar until fluffy. Add half of the Fluff, and beat on medium high until blended. Add the remaining Fluff, and continue to beat, on medium-high, for 2-5 minutes or until the frosting is fluffy and light and no longer marshmallowy.
This is what it should look like.


If the buttercream, does not form after beating for 5 minutes, place it in the refrigerator for 10 minutes, and then try and beat it again. After the buttercream forms, beat in the vanilla, corn syrup and milk, to taste.

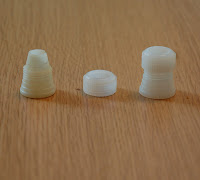
If you put a coupler in the pastry bag before filling it, you'll be able to try tips to find the one that works best with the size cupcake you are making.  The piece on the left goes into the pastry bag, and then the tip gets put on, and the nut, in the center, keeps the pastry tip tight.

Choose the tip that fits the size of the cupcake  (I used Magic Tip #8 for filling, and Wilton #21 star for filling)
Stick the tip into the bottom or top of the cupcake, depending on how you finish them (if you plan to add chocolate icing instead of having the frosting come out of the top, fill from the bottom, otherwise you will see the dimple where the frosting went in.  It's easier to fill them from the top.  For one thing, you don't have to take them out of the wrappers, which give some support to the cupcake so it doesn't split as you fill it.  You can also feel when the cupcake is filled with the buttercream, and can stop before the cupcake starts to split.


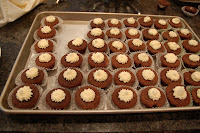
You can see they look great with nothing more than some frosting coming out the top.  But they're also fantastic, and  look like mini Hostess cupcakes if you frost them with chocolate icing and vanilla icing decoration.
Chocolate Icing
My notes didn't say if the following recipe is  the right amount to frost all of the cupcakes (sorry - I either post it now, or you have  to wait another year until I make them again!)

3/4 cup whipping cream
8 ounces semisweet chocolate, chopped
2 cups powdered sugar
2 tablespoons hot water

Heat the cream in a small microwave-safe bowl for 30 seconds. Stir in the chocolate.  Let it stand for a minute and then stir.  If the chocolate isn't completely melted, heat in 10-second increments on power 5, stirring between each, until the chocolate melts completely and the mixture can be stirred into a smooth glaze.

Sift the powdered sugar into a small bowl. Stir the chocolate into the powdered sugar. Stir in half of the hot water.  The mixture should be thin enough to fall off of the spoon in a steady stream.  If it isn't, add the remaining hot water, 1/2 teaspoon at a time.

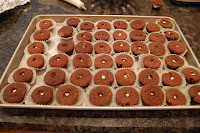
Dip the cupcakes into the glaze.  Turn the cupcakes right side up and let the glaze firm up a little.

 In the photo below you can see that I filled the cupcakes from the top, and I wasn't able to get the top level, so that the chocolate dips down  in the center.  You can add a decorative design, as I have here, to cover the dip, or you can add the vanilla glaze


Vanilla Glaze
1 cup  powdered sugar
1/2 teaspoon vanilla
2 tablespoons whipping cream

Sift the powdered sugar into a mixer bowl.  Whisk in the vanilla and the cream.  The glaze should be thick enough to pipe.  Add a little more sugar or cream, if necessary to get the proper texture.

For this amount of glaze, you'll need a very small piping bag.  You can make one out of a plastic storage or zip-top bag.  Cut the bag in half, horizontally.


Put the bag into a small glass, and then fill the bag


Hold the bag closed at the top, with the filled part resting in your palm, and your thumb and index finger holding the top (you can put a rubber band around the top if it is easier).  Gently squeeze the filling toward the tip.  Make a very tiny cut in the tip with scissors.  Pipe on the decoration, and then refrigerate until 30 minutes before serving.  


More Observations on the Hunger Challenge

Food Bank pantry
Yesterday's post was the most pitiful thing I think I've ever written. I tried a new recipe, Queso Panela Kebabs, and it was a failure. The cheese melted into a sad pile of goo. Failure happens but it's all the more discouraging when you're on a budget. It's not like you can run out and buy more ingredients. Also, you can probably tell, my heart just wasn't in it. I was feeling uninspired and that always comes across when I'm cooking (and writing). So I made a dull meal lacking any real creativity. It makes me embarrassed to read that post. But my embarrassment is nothing compared to the feelings that someone really living on a limited budget would experience.

There has been some criticism of the Hunger Challenge specifically from people who have experienced real hardship, some of whom have been on public assistance. I can completely understand why they would not want to participate and would feel uneasy with the Hunger Challenge. If I experienced real hunger I would not want to relive it or even be reminded of it. The Hunger Challenge is about the experience of living on a very limited budget. It is NOT an attempt to fully experience what someone actually living on a food stamps budget experiences, because that would be impossible.

In the future I hope the Hunger Challenge will make room at the table for those in our midst who have experienced hunger. I'd like to see a space for those who are willing to share their stories, like KitchenMage. Painful as it may be, those stories are more powerful than anything we who are taking the Hunger Challenge could ever share. Like the Hunger Challengers they raise awareness about hunger and also inspire readers to make donations. And really, no matter what we do, that's what it's all about.

Ways you can help

♥ Read blogs by people taking the Hunger Challenge. There's a blogroll here.

♥ Follow the Hunger Challengers on Twitter. There's a listing here, or search for the hashtag #HungerChallenge.

♥ Learn more about the San Francisco Food Bank - and make a donation. For every $1 donated the food bank can supply hungry people with $6 worth of food!

♥ Follow the San Francisco Food Bank on Twitter or visit their Facebook page to see how they're fighting hunger every day.

domingo, 20 de mayo de 2012

SORAKKAI SWEET KOOTU & PAAL KOOTU/ BOTTLE GOURD GRAVY- TWO VERSIONS

I learnt this from my MIL.. We are not find of this vegetable. So i buy bottle gourd very rarely. But whenever i buy , i make only this kootu. With vathakuzhambu , it tastes divine… I've given a spicy version too. But my vote goes to the sweet version Winking smileLove it a lot..!!

bottle gourd kootu

INGREDIENTS

  • Bottle gourd – 1 no (small size) or half if it is big
  • Green chilly – 1 no (chopped finely)
  • Salt & water – As needed
  • Powdered Jaggery – 1/4 cup (adjust )

To grind

  • Coconut – 1/4 cup or less
  • Rice flour – 1 tsp
  • Water – as needed

To temper

  • Mustard seeds – 1/4 tsp
  • Urad dal – 1/2 tsp
  • Red chilly – 1 no ( full , no need to pinch)
  • Curry leaves – a few

Milk (optional) at the end ..

METHOD

  • Wash and peel off the outer skin of bottle gourd .
  • Cut into two halves.Now remove the center portion which has seeds.
  • Finely chop it and add the green chilly pieces, salt and water.
  • Pressure cook up to one whistle.Meanwhile , grind the grated coconut with rice flour adding little water or milk.
  • Now open the cooker and add the powdered jaggery . Mix well. Let it boil for few minutes.Finally add the ground coconut mixture and allow it to thicken .. Add milk at the end if necessary ..
  • Temper all the ingredients given above in the same order. Add to kootu ..

Enjoy with Vathakulambu rice and papad !!

SORAKKAI PAAL KOOTU

  • Bottle gourd – 1 no (small size) or half if it is big
  • Sambhar powder – 1 tsp
  • Salt & water – As needed

To grind

  • Coconut – 1/4 cup or less
  • Rice flour – 1 tsp
  • Water – as needed

To temper

  • Mustard seeds – 1/4 tsp
  • Urad dal – 1/2 tsp
  • Red chilly – 1 no ( full , no need to pinch)
  • Curry leaves – a few

MILK – LITTLE AT THE END

 METHOD

  • Wash and peel off the outer skin of bottle gourd .
  • Cut into two halves.Now remove the center portion which has seeds.
  • Finely chop it and add the sambhar powder, salt and water.
  • Pressure cook up to one whistle.Meanwhile , grind the grated coconut with rice flour adding little water or milk.
  • Now open the cooker and add the ground coconut mixture and allow it to boil .. Add milk at the end if necessary ..
  • Temper all the items given above and add to kootu..

Enjoy with rice and papad !

bottle gourd kootu 1

 KITCHEN CLINIC

Bottle gourd

The bottlegourd belongs to the cucumber family and originated in Africa, and is now available in most parts of the world. Also known as calabash, cucuzza, sorakaya, lauki, doodhi, and ghiya in various languages, this vegetable comes in different  shapes, the most common being the bottle-shaped (hence the name) and round.
The sizes vary from six inches in length to more than six feet.In the US, bottlegourds are available in farmer's markets, Asian grocery stores, as well as mainstream markets.
This is a popular vegetable in Indian cooking. When cooked, bottlegourd can be slightly sweet or bland, and lends itself to a variety of dishes.
Dried bottlegourds are used to make water bottles, bowls, musical instruments, and decorative ornaments.

HEALTH BENEFITS

Bottlegourd contains a lot of water - almost 96 percent is water, and as such is light and easy to digest. Bottlegourd is commonly used for treating indigestion, constipation, and diarrhea. Bottlegourd juice with a pinch of salt is also used to treat dehydration caused by diarrhea.
The water content in bottlegourd along with the high fiber content helps with constipation as well.
Low in calories (100gms has 12 calories) and low in fat, bottlegourd is a wonderful vegetable to include in any weight-loss diet.
Regular use of cooked bottlegourd is considered an effective remedy for tuberculosis, and for boosting immunity.
Bottlegourd juice mixed with sesame oil in a 50:50 ratio and applied over the scalp every night is recommended as a natural remedy for insomnia. Cooked leaves of the bottlegourd plant are also considered to be effective.
Bottlegourd has a calming influence and is effective in treating hysteria; fresh bottlegourd pulp should be applied on the forehead of the patient.

Cooking Tips
  • Select small, tender, and firm bottlegourds (light green and fresh-looking); prick the skin, and if it's thin, it's tender. You can use tender bottlegourds with the peel and tender seeds. To use mature bottlegourd, remove the peel and seeds.
  • Taste the bottlegourds before cooking, as they can sometimes be bitter.
  • Wrap in plastic and refrigerate to keep the bottlegourds fresh.
  • Use them for curries, soups, salads, chutneys, jams or desserts. Their neutral taste lends itself to a variety of dishes, both savory and sweet..


RAW MANGO - DRUMSTICK GRAVY| PORICHA KUZHAMBU

I learnt this from my MIL. Usually we make this gravy only with drumstick. But during mango season , we make this combination. It tastes great with the excellent flavor of mango. If u don't get sour raw mango ,no problem , u can try this with drumstick alone by adding little tamarind extract to get the tangy taste. We mix this gravy in plain rice with little ghee.Here i've used Vengaaya vadagam for seasoning.I think most of u may not have/aware of this. So i've given the ingredients below to replace vadagam.

Try this simple & delicious poricha kuzhambu. Iam sure u'll love it and start to make it often.

MANGO PORICHA KULAMBU

 INGREDIENTS

  • Raw mango - 1 no ( Medium sized) (cut into cubes as shown in the above picture)
  • Drumstick - 2 nos
  • Moong dal - 2 tbsp
  • Sambhar powder - 1.5 - 2 tsp
  • Salt & water- As needed

To grind:

  • Grated coconut - 2 tbsp
  • Water - As needed.

To temper:( to replace vadagam)

  • Mustard seeds - 1/4 tsp
  • Urad dal - 1/4 tsp
  • Jeera - 1/4 tsp
  • Small onion - 10 nos ( cut into small pieces)
  • Curry leaves - a few (finely chopped)
  • Cooking oil - 1 tbsp

METHOD:

  • Pressure cook moong dal by adding a pinch of turmeric powder and a drop of oil. Mash it and set aside.
  • Now in a bowl , take the drumstick pieces.Add the required water & cover cook. When it is half cooked, add the cubed mango pieces and add more water if necessary. Once it starts to boil , add the sambhar powder, salt  & cooked moong dal. Cover cook till mangoes & drumstick pieces get cooked.{Make sure the mango pieces should not be mushy and dissolved in the gravy}.
  • Now grind the grated coconut adding little water to make a smooth paste.
  • Mix this paste to the gravy and allow it to boil for sometime. If u feel the gravy is too thick, add water to bring the consistency. (In this step , check the salt & spice, add if needed)
  • Suppose if the gravy is too watery after adding the coconut paste , u can add a little amount of rice flour to make the gravy thick.But this step is purely optional.
  • At last , season the gravy with vengaaya vadagam or the above mentioned items. If u use the above said items for tempering, saute till everything turns brown. This gives a spl flavor to the gravy.

ENJOY MIXNG WITH HOT PLAIN RICE & A DROP OF GHEE OR SERVE AS A  SIDE DISH FOR VATRAL KUZHAMBU / SAMBHAR RICE.

KITCHEN CLINIC:

DRUMSTICK

All parts of drumstick tree are useful and have long been used for nutritional, medicinal, and industrial purposes. The drumstick pods or fruits are used as a vegetable in curries and soups and very popular in Indian food. Crushed drumstick leaves are used as a domestic cleaning agent; powdered seeds are used for clarifying honey and sugarcane juice, and for purifying water. Moringa seeds produce oil, also known as Ben oil, which is a sweet non-sticky oil that doesn't become rancid. This oil is used in salads, for lubricating machines, and in perfumes and hair-care products.
The seeds are also eaten green, roasted, powdered and steeped for tea or used in curries. This tree has in recent times been advocated by organizations such as Trees for Life as an outstanding indigenous source of highly digestible protein, calcium, iron, Vitamin C, and carotenoids suitable for use in regions of the world where malnourishment is a major concern.

Drumstick and Health

Quick Facts
Almost all parts of the drumstick tree have medicinal value. The small, round leaves are especially beneficial in treating many ailments because of their high iron content and many medicinal properties.
Drumstick leaves can be eaten fresh, cooked, or stored as dried powder for many months without refrigeration, and reportedly without loss of nutritional value. Where starvation is imminent, consuming the drumstick-leaf powder can be life-saving.
According to the Trees for Life organization, "ounce-for-ounce, Moringa leaves contain more Vitamin A than carrots, more calcium than milk, more iron than spinach, more Vitamin C than oranges, and more potassium than bananas," and that the protein quality of Moringa leaves rivals that of milk and eggs.
Because of the high calcium, iron, and vitamins, drumstick leaves can be used as a wonderful tonic for infant and growing kids and teens to promote strong and healthy bones and for purifying the bloodstream. To prepare the tonic, drumstick leaves should be ground with water, filtered, and mixed with milk.
Drumstick-leaf juice is also very beneficial for pregnant women as it can help them overcome sluggishness of the uterus, ease delivery, and reduce post-delivery complications. In India, drumstick leaves are boiled in water and salt, the water is drained, and the leaves are served with ghee (clarified butter) to lactating mothers to increase breast milk.
Drumstick leaves are very useful in treating wheezing, asthma, bronchitis, and tuberculosis. A soup prepared by boiling a handful of leaves in 3/4 cup water for 5 minutes and cooled is served to those with respiratory problems. A little salt, pepper, and lime juice can be added to this soup.
Drumstick has antibacterial properties and as such is very useful in preventing infections such as those of the throat, chest, and skin. Drumstick soup can be prepared from the leaves, flowers, and pods and used for this purpose as an antibiotic. Dried and powdered bark of the drumstick root can also be used for fungal skin infections.
Drumstick leaves, flowers, and seeds are useful in treating sexual debility and weakness.
A teaspoonful of fresh drumstick-leaf juice mixed with honey and a glass of tender coconut water taken 2-3 times a day is a wonderful remedy for digestive disorders like diarrhea, dysentery, colitis, jaundice, and cholera. Drumstick-leaf juice is also effective in treating urinary disorders such as excessive urination.
Drumstick-seed oil is useful in treating conjunctivitis.
Fresh drumstick-leaf juice mixed with lime juice can also be applied to treat pimples, acne, and blackheads.


lunes, 14 de mayo de 2012

Bread Baking Babes - Irish While Soda Bread with Herbs

Kitchen of the month - Ilva from Lucullian Delights.
Recipe - Irish White Soda Bread with Herbs
Result - Delicious and easy.

Delicious and easy are 2 of my favorite things!


Apologies for this brief post.

If you'd like to be a buddy, or just make the bread, visit Ilva's website here to see the recipe.

All the Babes are listed over on the left for your viewing pleasure.